How to make a non regular tessellation
Have you ever wondered how non regular tessellation creations are made. You know what a tessellating tile is, but how do you figure out the outline for a quirky shape? Read this step by step process with beautiful images all the way!
Cut a two inch square piece of paper
Make a Square
Cut a two inch square from a piece of paper.

From the center point on one side, draw a wavy line to the center point of the opposite side.
Repeat this process for the remaining two sides.
Step 2
Place Dots

Place a dot in the corner of each square. These will be used only as guides!
Step 3
Cut!

Cut each of these sections from each other.
Step 4
Rearrange!

Rotate each of these pieces, so that all 4 90 degree angles (the corners with the dots) connect with each other at the center of the shape. Secure well with some tape.
Step 5
Create your new non regular tessellating shape.

Place your taped shape on a piece of card. Outline it, creating your new shape as one piece. This shape now tessellates perfectly!
Step 6
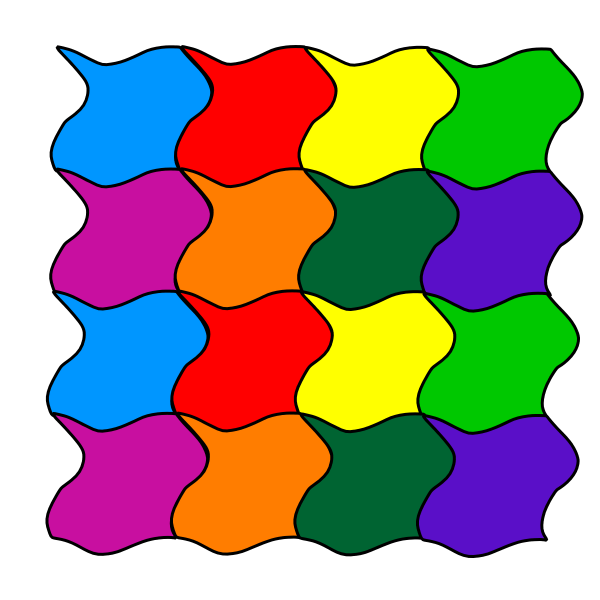
Test your shape!
Use your card shape as a stencil. Outline your shape on a piece of A4 paper. Then rotate to see how it fits together. Color each tile differently, to make a beautiful piece of art.
If you liked this page on how to make a non regular tessellation check out my page on tessellations.
Keep In Touch!
You can send me a quick message, follow me on Facebook or why not join our community of like minded parents? Choose all the options so you don't miss any of the new material added to this site.
JOIN THE CONVERSATION ON FACEBOOK
Know the Skill your Child must Know
Knowing every skill your child must master makes your task of helping them a lot more straight forward.
Your Tutoring Business?

Beyond Elementary
School ...
A clear M.A.P. makes a journey easier.